Adding Data to a Widget (Example)
Contents
Introduction
A common form of feature request is adding some data to be displayed on a page.
Here is an example that illustrates work flow required to add some data to a widget.
Issue #2551 required showing the data under the "Former_designating_laboratory" field on the widget "Overview" of a "Gene class" (the Gene class "daf" for example).
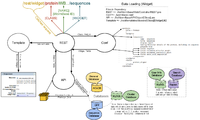
Using the data flow graph
we can see that data goes through 4 stages from the database to the UI - Rest, Conf, API and Template. Usually our work doesn't involve the Rest stage, but it sure does involve modifying the .conf (the configuration), .pm (the API) and .tt2 (the template) files.
If you go to the "daf" page [1], you can view the database you are going to be working on by going to Tools -> Tree Display using the menu on the left side of the page. Our field "Former_designating_laboratory" has two data objects under it, a time "19 Mar 2014 14:41:19" and a link to the lab "DR". In this example we are only going to care about displaying the time on the "Overview" widget (if you can't see a widget you can show it by clicking on it from the side menu).
Modify configuration file
The wormbase.conf file, which you can find under the main website directory contains default configurations for the WormBase application.
Now under the "overview" element of the "gene_class" section add the Former Designating Laboratory field "fields former_laboratory".
	<gene_class>
		<overview>
			name overview
			title Overview
			display report
			tooltip Gene class (eg Unc) overview.
			fields name
			fields other_names
			fields description
			fields laboratory
			fields former_laboratory
			fields remarks
		</overview>
	</gene_class>
Add a subroutine to the API module
Add a subroutine "former_laboratory" to the API file of the Gene class object in order to grab the data from the database.
(The Gene_class.pm - API file of the Gene class - is in the directory lib/WormBase/API/Object/.)
sub former_laboratory {
    my $self = shift;
    my $object    = $self->object;
    # Access the field Former_designating_laboratory
    my $former_lab_time = $object->Former_designating_laboratory;


    return   { description => 'Former_designating_laboratory', data =>  "$former_lab_time" || undef };
                       }
Return a hash that contains the description of the field and the former lab time. The value of the "data" key should be "undef" if there is no data in the "Former_designating_laboratory" field. If the "data" is "undef" the template won't show a "Former designating laboratory" field on the UI.
Edit template: for displaying data
A template - with the file extension .tt2 - is responsible of view the data grabbed from the database on the the UI. Every widget in an object has its own separate template. So if you go to this directory root/templates/classes/gene_class/ which contains all the Gene class widgets you will find a template for the Overview widget with the name overview.tt2.
Add a new WRAPPER for the field. The key parameter should match our subroutine name that we made in the API file - which was "former_laboratory" -.
WRAPPER $field_block title="$title"||'Former Designating Laboratory' key="former_laboratory";
     #Access the value of the "data" key returned from the former_laboratory subroutine
     fields.former_laboratory.data;
END;
You can check out how "$field_block" works from the page_elements.tt2 template. "$field_block" looks of the data returned from former_laboratory if "undef" or not. If it is "undef" - which means there is no data in the that field - it disables the element of the field, and it isn't going to show on the UI.
Formal Testing
It's a good idea to include some test cases for your modification.
Here we focuse on API Tests, which check that an API module (the subroutine it has) successfully retrieves values from the database.
API Tests are located at t/api_tests/ with the extension .t. A .t script usually test a single API module, such as one of the .pm file under lib/WormBase/API/Object/. It has a file name that matches the API module, which it tests. This convention helps with locating a test file, making it easier to add new test case.
- To add a test case, locate the test file as described above. Create one if you cannot find one by:
- Copy the
template.t, a sample test file, and name it according to which API module is being tested
- Copy the
- include a test case, which usually contains test for:
- subroutine can be called on the API object
- data is returned from the subroutine
- data return is correct
- Example
    # This is a test that checks whether former_laboratory attribute is correctly returned
    # related to #2551
    sub test_former_designating_laboratory {
        my $gene_class = $api->fetch({ class => 'Gene_class', name => 'daf' });

        can_ok('WormBase::API::Object::Gene_class', ('former_laboratory'));

        my $former_designating_laboratory = $gene_class->former_laboratory();

        # Please keep test names/descriptions all lower case.
        isnt($former_designating_laboratory->{'data'}, undef, 'data returned');
	is($former_designating_laboratory->{'data'}->{'lab'}->{'id'}, 'DR', 'correct lab returned');
	is($former_designating_laboratory->{'data'}{'time'}, '19 Mar 2014 14:41:19', 'correct time returned');
    }
Make sure to read the instructions that are inside the template and to add the issue number in the comments.
- Run a test script with
API_TESTS=testFileNameWithoutExtension perl t/api.t
Test and Commit Changes
At last, test the web page on Dev site, and commit your code to git. If you have trouble doing that, it's good to check out Development workflow - webdev.
